Almost two weeks ago I bought a new laptop. I bought an ASUS VivoBook Pro N580VD-E4556T, a decent laptop with great specs.
Display: 15,6 inch (1920 x 1080)
Processor: Intel Core i7-7700HQ
Memory: 16 GB
Storage: 256 GB SDD + 1 TB HDD
Graphic card: NVIDIA GeForce GTX 1050
It came with a Windows 10 Home edition pre-installed! For me as a Linux user I had to install Linux, Ubuntu 16.04.
My old laptop, I still use it, was also an Asus laptop. He is now 5 years old, and he has 16 GB ram and 256 GB SDD + 1 TB HDD. The laptop has dual booting, I have installed Windows 10 and Ubunutu 16.04 on it.
The problem
Installing Ubuntu 16.04 is quite straight forward and doesn’t require the user to be a Linux Ninja to get a laptop up and running with Ubunutu. However, this time the installation wasn’t as easy as I always have experienced. I wanted to install Ubuntu from an usb stick which I made bootable using rufus on windows 10. The usb had a GPT partition scheme for UEFI (Unified Extensible Firmware Interface). The laptop doesn’t have BIOS, it’s new and it has UEFI, and the windows 10 was installed in UEFI mode, so it’s quite obvious that I will install Ubuntu in UEFI mode as well. After booting into Ubuntu installation and passing the first two screen, the installation stuck on the ‘Preparing to install Ubuntu’.
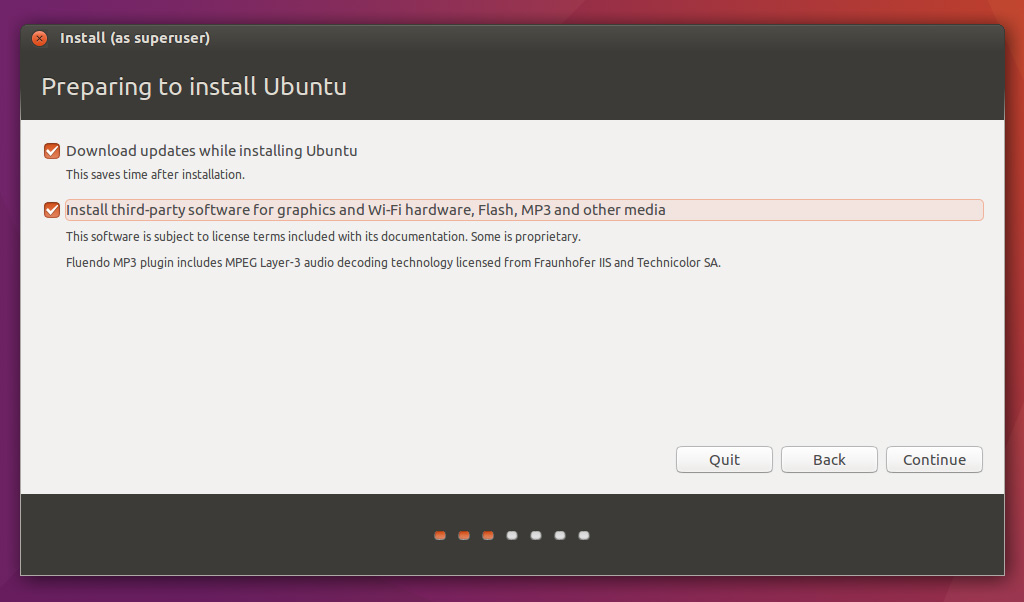
I waited more than 10 minutes and I thought maybe it needs time, but no luck. I changed the usb stick and tried another one, but I got the same result! I started then googling and I have seen many topics/questions on askubuntu.com, ubuntuforums and many other sites. It seems many users have this problem and some other problems which are somehow related to it.
The solution
It seems that the problem has to do with APCI (Advanced Configuration and Power Interface).
ACPI (Advanced Configuration and Power Interface) is an open industry specification co-developed by Hewlett-Packard, Intel, Microsoft, Phoenix, and Toshiba.
ACPI establishes industry-standard interfaces enabling OS-directed configuration, power management, and thermal management of mobile, desktop, and server platforms. Sourec
As I read, the problem is that the Linux kernel had some issues with dealing with the ACPI standard, which means that the laptop doesn’t know how to act, especially when it comes to Linux. It’s noteworthy that Windows doesn’t have this problem!
I have tried to install Ubuntu 17 and 18, because I thought maybe a newer kernel will be able to overcome this problem, but I didn’t helped!
The solution can be done by editing the grub file, adjusting/adding kernel parameters, during the installation. Check the following picture: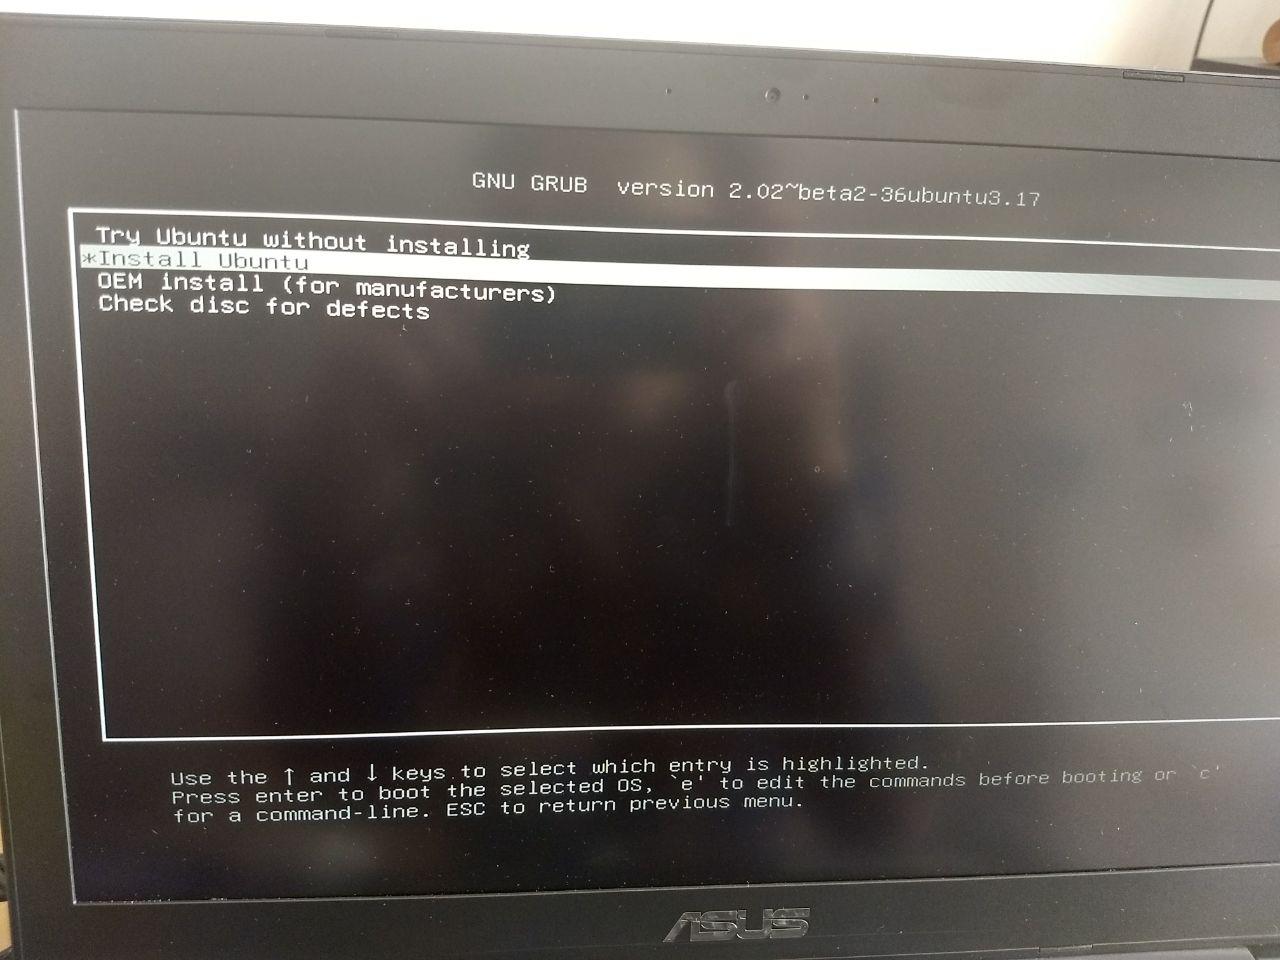
Select the ‘Install Ubuntu’ , don’t press Enter, but press e. You will get another screen where you can adjust kernel options. You can solve the problem using one of the two kernel parameters:
1) Acpi=off
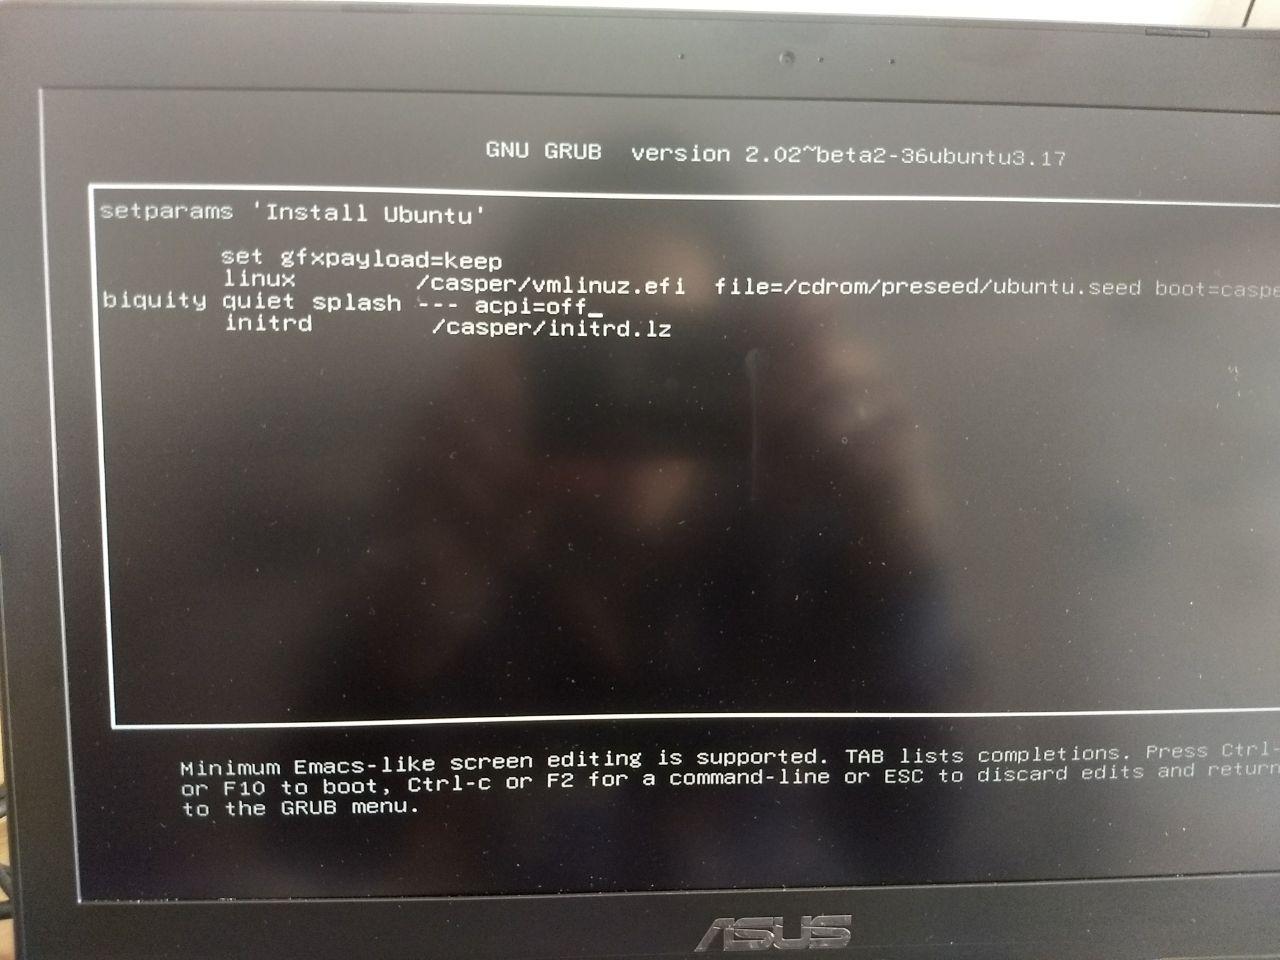
You add it, just like in the picture, after quiet splash acpi=off
This will disable the acpi. For more info about this parameter and other ones check this page Kernel-Parameters.txt
You have to press F10 after adding it to grub, this will lead you to the installation which can be done as usual without any freezes!
2) nomodeset

You add it, just like in the picture, after quiet splash nomodeset
This tells the kernel to not start video drivers until the system is up and running.
You have to press F10 after adding it to grub, this will lead you to the installation which can be done as usual!
Note: adding this kernel parameter temporarily or permanently (by editing /etc/default/grub after installing Ubuntu) will adjust the screen resolution back to 800*600. So don’t panic! What you have to do is delete the parameter from the grub file and then re-save it.
When you edit the grub file, sudo vim etc/default/grub don’t forget to run this command sudo update-grub and then reboot!
Conclusion
If you search online with specific keywords which are related to this problem, you will notice how many users are affected by this problem. The reason isn’t clear and all what you read are speculations. No one can point out what exactly the reason is, it could be wifi, touchpad or graphic card.
In my onion, I can conclude and say with 100% certainty that this problem is “GPU” related, and specifically nVidia. You don’t need to disable all acpi, you have only prevent the kernel using your graphic card until the system is fully up and running.
Update 16/05/2018
Based on comments from @GUILHERME and @EDMUND if my solution doesn’t work try to add:
acpi_osi or “noapic” and “nolapic” to the kernel options. For more information about the kernel options and what do they mean exactly, check this link: http://redsymbol.net/linux-kernel-boot-parameters/
Leave a Reply to guilherme sousa Cancel reply